Showing posts with label robot. Show all posts

Wednesday, January 23, 2013

Robot Valentine's Party

Hello!

I can't believe how close we are to Valentine's Day! We honestly still have our boxed up Christmas decorations still in the garage, nowhere closer to being put into the attic than they were a week ago. Which also means that our Valentine's decorations are nowhere near being closer to being down here :) So in the mean time, I thought it might be fun to repost a little bit of the holiday from year. 

Last year I threw together a quick little party for a few of the kid's friends. The party was about 1 week before we moved into our current place (and only two weeks after we even found out we were moving!), so it was a little hectic at that time to say the least :) 

My obsession with Chevron was in full swing, and I was really excited to get started on creating a digital party (my first one to ever be added to my Etsy store!)


I made a DIY Robot Wreath to welcome our guests with items from the dollar store - 
and included a FREE ROBOT PRINTABLE to make your own. 


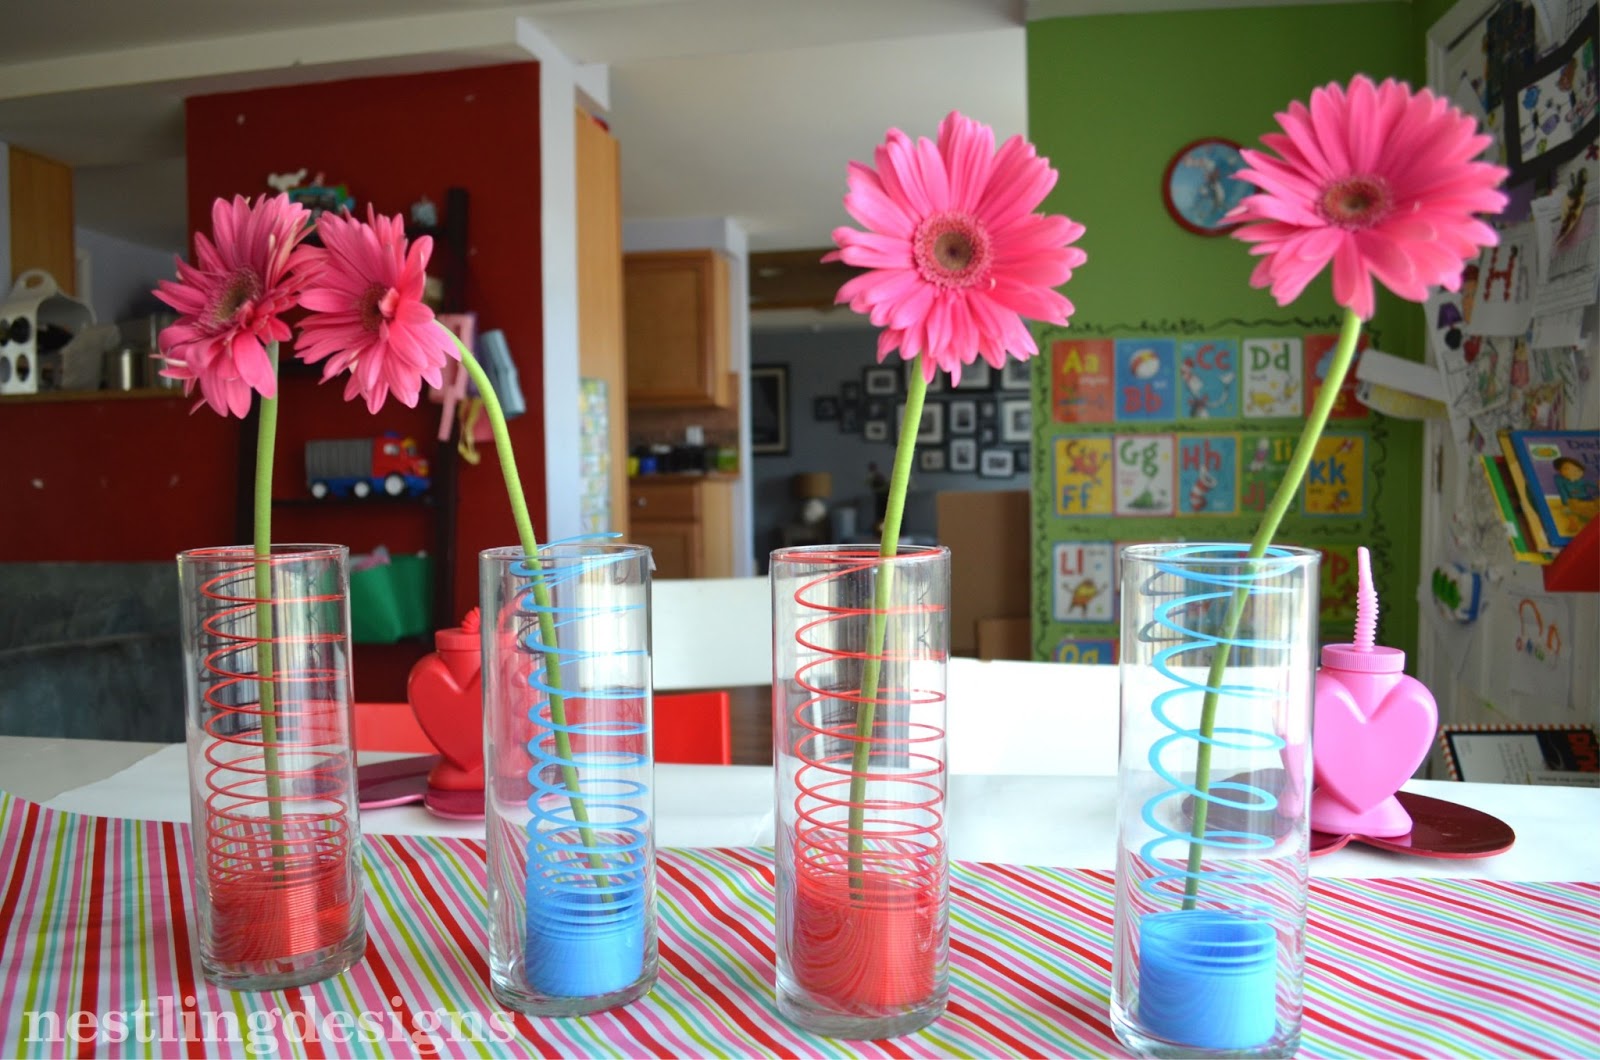
Slinkies were a big deal at this party - I used them to make a robot, jazz up some vases, and hung them from the ceiling for decoration:


...I even used a cute heart shaped one as a napkin ring :)


As decoration, I built a Robot out of boxes and wrapping paper. 


Guests got some cute goody bags...


...as well as some fun DIY Robot Candy Valentines


The whole collection (including printable valentines) are available this year again in my Etsy Shop.


Happy Hump Day!

xo, 

Rachel


Linking Up.....

Grab a button!


. 

Tuesday, February 7, 2012

Robot Inspired Vases

I am beginning to feel like all I talk about are robots :)

That is how it is at our house. Whatever party we have coming up seems to be the latest obsession.
Case in point: I woke up to our oldest son chasing our daughter with a diaper box on his head, claiming he was a robot. Is it bad that even though I was only half awake, I still thought to myself, "if we put some slinkies over his arms, that could actually be a cute diy costume" ?? Hmmm.

I digress.

My current obsession, to go with all things robot, has been slinkies. I mean, really, how fun are these things?

Valentine's Day and flowers pretty much go hand in hand, so I began thinking of ways to make a vase out of slinkies. And then I just stuck one into a vase I already had from the dollar store, and there you go: perfection. :)


I love how it's a subtle decoration, but really adds that clean, modern look that I tend to strive for.


::::sigh::::

Sometimes it's really the smallest details that make you the happiest, isn't it?


Rachel

Sunday, February 5, 2012

diy Robot Wreath

I firmly believe that when you throw a party (especially for children), that decorating where your guests enter is just as important as the decorations for the party itself, because you want to set the tone the moment they arrive. So what better way to welcome our guests to a robot party, than a a custum wreath? Wreaths are such a versatile way to introduce your theme. We have wreaths for holidays, so why not parties?

I love LOVE the idea of using slinkies in our robot party. They remind me of springs, an object I am sure robots would be made out! Not to mention, they are CHEAP. So this wreath was inspired by that :)


First, I gathered up all my supplies:


 I made my wreath base out of foam that we have lying around. You could also buy one from the store. First, you will need to cut out the robot and hearts from the sheet of paper. Trace a circle the size of the wreath that you want onto the foam. I made mine about 12" wide & about 2" thick.


Next, glue the robot and hearts onto the foam. you could always use posterboard as well, but I think the foam is much sturdier. Using an exacto knife, cut out your objects, including the wreath.


I first attached the slinkies to each outher, and then to the foam using hot glue. I ended up using 3 slinkies for this wreath, because I didn't want it be too stretched out that it wouldn't look springy. I started by "corners" and then worked my way around. After, I attached my robot head onto the back. I had an extra "antenna" leftover from the headband I used for a previous project, so I then attached that to my robot as well. You can always make one out of pipe cleaners and construction paper, too.


Finally, glue on any accessories, such as the digital hearts. I also used nuts and bolts I found at the dollar store. Wrap ribbon around top and tie into bow.

Over all, I am pleased with how it turned out. I think in hindsight, I would have made my wreath larger.

Click Here to upload a free pdf file of the robot and hearts, so you can make your own wreath! You could always eliminate the hearts and make it a more birthday-like wreath. Add a welcome sign or the child's age to really personalize it!

Rachel

Thursday, February 2, 2012

how to build a robot


I mentioned yesterday that after I got the robot bug in me, soon everything around me made me think about them! Which is how this guy came to be. We almost always have boxes lying around from either packages from the grandparents or a little retail therapy. Soon I envisioned some of our empty boxes with the wrapping paper I had had my eye on from Target....(see how I managed to find a reason to buy said paper???) ....and that's how it all began :)
This project was pretty simple. I made it using mostly objects that we had around the house, but you could always substitue something you had around your own home. I have to say, the big guy came out pretty cool (although larger than I thought he would be!) and the kids love him. I made him to go with our Robot Valentines party we are having, however, you could EASILY switch out the colors and patterns to make him for any party. What an awesome photo prop he would make at a birthday party!! You could even (gasp!!) make him a her and add a bow.

So this is how I made him:


Like I said, I basically gathered around stuff that we already had (except for, of course, my Target purchases :)  ) Use boxes based on how large you want your robot to be. I recommend stacking them up before you commit, so you can get a better idea of how they will look. I did this, and was STILL shock by how tall he was. I think his legs are a little too long, but that is something that you can always cut down (and truthfully, will make him more sturdy). Also, try to use sturdy boxes because you will be gluing things and poking things into them.

First, wrap up the boxes with your paper. As you can see below, since the fancy Target paper was shorter than normal paper, it left me with a gap. It inspired to be to come up with a creative solution that I actually prefer. I used a cordinating paper, cut it to about 2" wide and wrapped /glued it around the entire box. Plus, this eleminated having large folds to be seen on the side, so this would be a good option even if you paper was large enough.


Do this for the body and head. Before you cover the shoes, make sure to punch a hole in the center where the legs will enter. I used my circle cutter, but you can always cut by hand. For the shoes, you will want the top of the box open (or at least cut for the legs), with the pieces of styrofoam inside. Wrap  up the shoes, leaving the opening circle on top (above the open part of the box). For the legs, I just used the paper towel rolls and rolled them up normal. Check the height of the legs and trim down any before you wrap. (keep in mind they will be going through the shoe boxes, so measure from the ground to the base of your torso box).


Once you have wrapped everything, stick legs into the opeing of the shoes and secure them into the styrofoam. I later hot glued around the edges to make sure it was really in there. Remember these babies will be holding up your 'bot, so you want them to be sturdy.

The next few picture might be a little blurry. They were taken by my phone while my napping little man held our camera hostage in our room :)


First, I worked on the head. I cut down toilet paper rolls to size I wanted  (you can use paper towel rolls or an excess you had from the legs). Wrap it in scrapbook paper or leftover wrapping paper. You can either glue or tape them onto your head. Gluing would be best, but you will have to wait for it to dry. For the eyes, I circle punched out my scrap paper as the backing to my googly eyes. Glue said eyes onto the paper. (The 'bolts' around the eyes were hole punches from the same paper raised by scrapbooking sticker dots). Make a mouth out of paper. Glue both eyes and mouth to head.
For the antenna, I purchased a headband from the dollar store. I cut one off to use for this project, and saved the other for a project I have planned later this week. Once glued, his head is complete! And you then have a robot head watching your every move as you build him a body :)
For the 'hands' I drew and cut out magnet shapes from a scrap piece of foam I had. (also from the dollar store). Trace cutouts on wrapping or scrapbook paper; cut and glue onto both sides of foam. Take your dowel (I sharpened mine with a regular pencil sharpener on both sides). Stick into foam and adhere with glue ( I used regular elmers glue for this). Your slinky will go around this.


You are now ready to glue your robot together!! Before I glued the legs to my torso base, I placed the torso on the legs to see how it would balance (this will also tell you if you need to trim down the legs some more). Once I found a good spot, I marked where the legs were by tracing around the roll. This would tell me where to glue the legs back on. I used hot glue for this. I have no patience for regular glue and I think hot glue will hold better. That said, you do have to work FAST.
I assembled my guy in this order:
Torso onto legs
Slinky on to "magnet" base.
Stuck other end of rod into Torso (another good reason to sharpen!) & glued around edges
After postioning it how I wanted the arm to be, glue other end of slinky to Torso.
Glue on head.

After all that you are left with one amazing accessory to any robot party:


Since I already made this digital heart for my robot party collection, I simply printed up a larger image and glued that on to his stomach. I had wanted to give out a free PDF file download for this, but I don't know how to put that on my page yet..... So, soon :)

I hope you found this tutorial inspiring! I would LOVE to see your own take on this project!!

Rachel

Wednesday, February 1, 2012

Introducing "All A-Bot Love" Robot Party

I am super excited to share with you what I have been working on for my Etsy shop.

I mentioned yesterday how inspired I was by some of the robot finds I saw at Target a few weeks back. Once I decided that I just HAD to do it, I started designing this robot collection. And once I started, I just kept on going :). I knew it had to be fun & modern, and involve two of my new latest obsessions: chevron and aqua. I mean really, aqua looks so amazing with the red and pink how could you not??

Every year our family makes a huge batch of heart shaped cookies to decorate. Since our son's school doesn't do parties for the big V-Day (I mean, really??) I thought it would be nice to have some of the kids over to celebrate with us.

It all began with the invitation:


And soon evolved into much more :)


.....and more


...and into a small obsession....


...soon I even began to start seeing everyday objects, like boxes & slinkies, become 'robot parts.' Which is how that big guy in the background in the top, left photo (above) came to be. But more on him (and how to make him!) tomorrow.

I had a lot of fun designing this collection, and am excited that it is the first one to make my Etsy shop. I hope you enjoyed it as well. Now, if only I could get motivated to add my other collections on there as well :)

All the items are available at My Etsy Shop.
Visit now, and receive a 20% discount!!! Just type in BLOGLOVE1 at your checkout.

I hope you have an inspiring day!

Rachel

Tuesday, January 31, 2012

Welcome to Nestling!

Welcome! Welcome! I am so excited to share this blog: this crazy combination of the creations I make. One of the definitions of Nestling is "any small child" and I chose this because most of my designs and parties revolve around the three little crazy adorable people in my life: my kids. I am constantly inspired by everything that surrounds me, and my hope is that this blog will inspire you too. Along with this blog, I am debuting my new Etsy store. You know how you always say things that you should do "one day" ("I really should start that blog" or "I do so many parties, I really need to open up an Etsy shop" or "we really need to move to a larger house")? Well, that time is now for me! As in, all of the above, at the same time :) Because I am....ambitious like that. Or just crazy.

So let's jump right in :)

Things are in full Valentine's Day mode around here. Because what normal family doesn't start decorating 3 weeks in advance? (ha!) About 3 weeks ago I stumbled upon all the robot goodies in the Target $1 aisles, and thought "OMG" (b/c in my head I talk like a valley girl apparently)," that could be the coolest theme for our Valentine's cookie decorating party". And then the madness ensued. I am talking full blown robot craziness.

It would be no fun to show you everything at once, but here is sneak peek at what is to come :

I can't wait to share everything with you!! Some of the stuff is from my Etsy line, but a lot of them are fun DIY projects that you can easily (and cheaply!) do yourself.

This blog is brand new for me, so over the next few weeks I will be slowly creating it to look how I want. So, please, make sure you come back to see how it looks :)

Rachel