Tuesday, September 25, 2012

Inspiration is everywhere

So.....I have been thinking about having a Halloween party for the kiddos and their friends. Our neighbor next to our old has last year threw a party and our kids had such a blast going there in there little costumes that I just can't get the idea out of my head!! Imagine that :) Although the two older kids will have their own parties at their school, our little man will have none and it would be nice to have everyone together with all of their mutual friends.
 
I'm still not completely sure if we are going through with it, but in the mean time I have begun to start mentally planning it. I started off with the idea of a 'witch' theme, but hadn't gotten much further than that, until....
 
 
I just happened to look down at my own feet the other day on the way to walk down to the bus stop.
Picture this: black and white chevron with accents in a bright green. Can you see it??? Well, I can and I am super excited :)
 
Isn't it amazing where inspiration strikes sometimes?
 
Hope you're having a great week!
 
xo,
Rachel


Monday, September 24, 2012

DIY :: Fabric Covered Pinboards

When we were originally designing our family room redo, I was trying to figure out what I wanted to do on the wall behind the kid's desks. I wanted a variety of surfaces in this room- magnetic, chalkboard, and a pin board.
 
Today, I am super excited to share with you how I created custom fabric covered pin boards for our space. The idea is nothing new, but when I found some adorable shaped corkboards in Target's dollar isles (these were $2.50), I just knew I had to do something amazing with them. In fact, oddly enough, these babies were the motivation I needed to actually start this project.
 
 
The supplies needed for this project are super easy- a corkboard (you could easily do this with any shape/size corkboard. They even make cork contact paper that you could cut into any shape you want), spray adhesive, and fabric.

 
First, I turned my fabric around. I used fabric that I am also using somewhere else in the room. Also, (very important!) make sure to turn the object you are tracing around. I almost didn't do this...could have been tragic :) Make sure if you are using a patterned fabric to line it up so that your pattern is straight. It would be horrible to cut out all that beautiful fabric only to find that it looks all lopsided once you put it on your board.

 
Trace around your shape. Make sure to get a close trace, since you don't really want any extra fabric hanging off the edge.

 
Cut out your fabric.

 
Since my shape is so detailed, I lined up my fabric onto the board before gluing. Once lined up, I pinned down half of the fabric to keep it in place.


The unpinned side I lifted up and sprayed with my adhesive.

 
Place and smooth fabric down and repeat with other side.

 
I put a little mod podge around the edges to prevent the fabric from fraying.
 
I am sooooo happy with how this project turned out. L.O.V.E it.


So now each kid has their own board to display their work, and I have three beautiful pops of color to look at in our (still, slowly coming together) family room :)
 
 win-win, right??
 
Isn't it amazing how the small projects sometimes make us the happiest?
 
 
xo,
Rachel


Linking Up....
 
 
about an hour link button

Tuesday, September 18, 2012

DIY alphabet art

I am super excited to show off one of the little DIY projects I recently did around here for our family room.
 
To keep costs low not completely outrageous, I have been trying to come up with some creative ideas for art. {one project being a complete FAIL this past weekend!}. I was completely inspired by an idea I saw during one of my last trips to the store, Land of Nod.
 
 Letters_SpellYaLater_Girl_1211
 
 
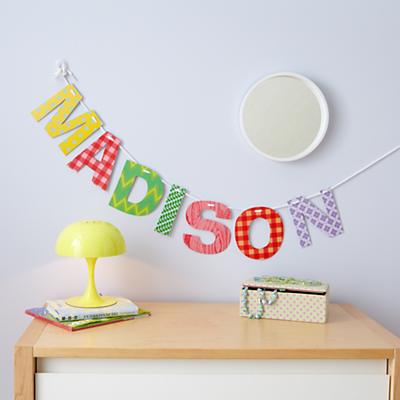
They had all these adorable alphabet letters that could be strung with a shoelace in different patterns/colors. I loved the idea of hanging up a simple word on our wall, and I thought of one of our kid's favorite things to write, "xoxo". Cute and simple, right?
 
The problem? You don't get to choose the color or pattern, so I was pretty much left with what they had:
 
 
Ummmm, not my first pick for this space, that's for sure. But I just LOVED this idea. Each letter is $3 (plus a shoelace!), so the project would have only cost around $15 (which, I promise you, would have been the cheapest thing I walked out with that day. ha!).... but I just couldn't stop thinking, "hey, you could totally make this project for FREE and have it match the space."
 
So. Here we are :)
 
 
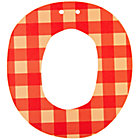
First thing I did was make some letters on the computer using patterns. I realize that a lot of people don't have this kind of software at home, but scrapbook paper could work just as easily (and you could probably find some way better patterns!) I then printed them out (I did 2 to a page), and cut them out loosely around the edges. (If you are doing scrapbook paper, I would create my letter template on card stock and then trace around them on my specialty paper, OR just print on the back of the scrapbook paper-in which case you will want to cut your letters out more exact).

 
Next, I glued my letters onto poster board for extra durability and thickness. (you can see how I just quickly cut around the edges the first time). For this, I used a spray adhesive, but you can use regular glue.

 
Then I cut out my letters and punched holes in the top to string my ribbon (I used scrap ribbon I already had; you could use yarn, shoelaces, or twine). I also debated ditching the punched holes all together and just hanging them up with clothespins, but I stood by my original idea.

 
We placed screws at the end points to tie our ribbon around. Since our room has a more modern feel, I like the idea of being able to see the screw, but you could always find something more decorative like drawer knobs or pretty hooks to hang them from as well.

 
I also LOVE the idea that the letters are so easy to switch out. I'm already thinking ahead to Halloween, with words like "BOO" or "SPOOKY".

 
And a little sneak peak at some of the other art:

 
I don't think that this little space is quiiiiite done yet, but it's getting there :) As for the rest of the room- we made some progress this week.  We would have made more progress, if I didn't keep adding on little projects here and there for us, I am sure!!
 
 
xo,
Rachel


Sunday, September 16, 2012

Happy Weekend

 
Making our turn for bringing snacks to Cayden's soccer team a little more fun:


The stickers were {ironically} scratch and sniff APPLE scented :)
 
Happy Weekend!!
 
 
xo,
Rachel

Thursday, September 13, 2012

Eclectic Art Gallery

Hi there!
 
We have slowly been plugging away at our family room {a project, I am DETERMINED to finish this weekend!}, and tonight I started work on trying to figure out the layout I would like to hang our art in. Because we have the smallest budget ever and most of that went to wood and other desk stuff, art for this space is one area I am definitely saving some money on. I am gathering all the misc. frames we have laying around and would like to create a bit of a gallery wall.
 
You see, I have been slightly completely obsessed with the look of eclectic wall galleries like these:
 
Pinned Image
 
Pinned Image


Pinned Image
 
Pinned Image
 
**all photos without sources listed could not be found by their original website. If you know where they are from, I will gladly add them :)***
 
I totally planned on doing this fantastic look in our living room. In fact, most of the fabric I am using in the family room was originally bought for out living room. But then when I showed Jason all these amazing photos, he was less than impressed. So I compromised on the living room, but it is just too perfect for this space to pass up.
 
Plus, it is great for this project, because I am literally just making it up as I go.
 
The problem with this asymmetrical design, is...... I am horrible at doing it! It is the hardest thing to really nail down. That said, I also think that I over think it. {see that? there I go thinking even more!ha!} I think the beauty of it is that it doesn't look designed, it looks like a collection that has been added on to throughout the years.
 
I have no pinterest-worthy method to how I figure out where to hang frames. I just placed them all on the ground and arrange them {snap a picture} and rearrange them {snap some more}. I then narrowed it down to two layouts that I liked the most (I just did a quick sketch on my computer so you can can a better idea than my oddly angled photos):


Although they may seem pretty similar, there are slight differences. I was pretty determined to have the largest photo on the left since it is how I have pictured it for {literally} months now. The large circle is this awesome clock I found at a random {but not surprising} trip to HomeGoods. {random being that this one is nooooo where near our home}. The "Z" is a project that I am not even sure if I will doing, but even if I don't I will replace it with something similar.
 
 
So, which one do you think looks the best??
Here's a side by side:


I would love to hear your thoughts! They go up on the wall in just a couple of days!
 
 
xo,
Rachel


Wednesday, September 12, 2012

New Beginning

Just a quick little note so that you can see what we have been up to around here.
 
You see, our beautiful, stubborn, hilarious little girl started PreK this week.
 
 
And she could not have more excited :)
(Her brother on was less than impressed)

 
Don't be fooled, the picture on the right is not her crying...it's her annoyed with me for taking so many pictures!
 
I cannot believe how fast the time has gone!
 
{I also cannot believe that Jason and I went out to the store today with only ONE child!}
 
And if you were wondering, when she came home I asked her if she missed us.....the answer was, without missing a beat, "NO!". At least our oldest lied a little to save our feelings when we asked him the same question 2 years ago :)
 
 
xo,
Rachel


Monday, September 10, 2012

Paper Plate Gallery

Hello!
 
A couple of weeks back my son requested that we buy some paper plates for a specific craft that he wanted to do. We almost never have any paper plates on hand, so I bought a cheap pack of Target brand plates, 200 count. He did his craft...and there we were left with 198 plates.
 
I started handing them out instead of drawing paper for no other reason other than I am L.A.Z.Y. and the plates were already on the counter :) You know what? Paper plates are freaking awesome for art projects. They are thicker than paper for paint (nothing sadder than a wet, limp piece of paper filled to the brim with paint), and creates a nice raised border so that your little artist actually stays on the paper (plate).
 
Well, before I knew it, I had a bunch of little pieces of art. Each like a mini canvas, I knew I had to do something great with them. I started thinking about how people hang up plates as art all the time, and I thought why not?
 
We have this big, blank wall at the landing on the top of our stairs that I have had planned to create a gallery wall of our kid's art, since I love the idea that one of the first things you will see when you enter our house is all this colorful art. The only thing that has been holding me back is the price tag of the frames. I really want to use the Ribba frame from Ikea, but even at the $5 pricetag it adds up when you want 16 of them.... So I figured why not just go for a gallery wall of paper plates.
 
I went up there with no plan, just a stack of plates, and some thumbtacks I had lying around. I wanted to do a more abstract layout, but since I had so many plates, I went for a simple gallery look.
 
 
I LOVE the dimension they give to the wall.


Here's the view from the from door:

 
I have to say, that we really like how it turned out. It's a great substitution for the frames {for now}, and can easily be added to or substituted with new art.
And the kids loved it too, so I think we had a success :)
 
Happy Monday!
 
xo
Rachel


Linking Up....
 
The Celebration Shoppe

Sunday, September 9, 2012

Happy Weekend!

We had a busy {and productive} weekend around here...
 
 
Soccer started up:


Can you believe it...an actual smile!!

 
The kids did their well earned movie night:

 
Made some chalkboard paint using this tutorial

 
{We are out of red food coloring if you were wondering why it's all blue and green!!}
 
 
....and worked some more on the family room....and guesses???
 
 
Happy Weekend!
Rachel