Monday, April 30, 2012

Monster Party Inspiration

Hello!
I hope your weekend was a great one! Although I didn't get nearly as much as I wanted to done, I did make a little headway on the Monster Truck party. Only a little bit though-- have you ever had a week where every piece of technology you own is on a plot to make your life as hard as possible?? Well, I am having that kind of week :)

Whenever I start planning for any party I plan, or room I design, I always start with an inspiration board. This is where I begin to gather images that either inspire me or give me ideas.

Of course, these days, Pinterest makes that job a whole lot easier :)

Here are a few pins I have gathered and stumbled upon in my never-ending google searching:

You can see all of the images and their sources on my pinterest board.

Some ideas I will be using; some are things that have inspired me to create something else. Some are just awesome ideas and should be shared :)

I am super excited to share with you my actual plan for the party tomorrow! That is basically all I managed to accomplish this weekend, but it's usually one of my favorite steps!

See you then-

xo
Rachel


Friday, April 27, 2012

Freebie Friday: Vintage Labels


Today's Freebie Friday is a fantastic find I stumbled upon yesterday while looking for labels to cover up some cans I want to use for marker storage (grown up markers this time, not crayola!)

They are vintage inspired Mailing Labels, although I am sure if you have a program to plug them into, you could make them large enough to cover a can.


They can be printed over so you can add your own text/address. You can find them here.

This would be an adorable (and free!) way to dress up something for a little girls' room.

Have a great weekend!

xo,
Rachel


Thursday, April 26, 2012

Banquette Dreaming

Hello all! Today was a pretty productive day for me; I finished creating the invitation for Jameson's party (we are printing these up this weekend, along with a little "project" for my boy to do) Hopefully I will have pics up next week! I also made a little headway on a "CraftLand" project we are undertaking over here. That's a fancy way of saying I own a TON of crafting/party/design/art stuff that needs a home :)

Which brings me to a little segment I haven't done in awhile:


Yesterday I promised a peek at a great find I stumbled upon. I had gone to the thrift store in search of storage solution for the new CraftLand, but came home with a little more instead. Don't you love when that happens :)


Last time I showed you a picture of a table we found here. It's currently a pretty ugly table, but I have big plans for it. 

Because of the small kitchen area we have we downsized to this smaller table, and since we did, I have been dreaming of a banquette. A beautiful, casual, comfortable  place to enjoy our anything but relaxing/calm meals.

Like these:


Although I would LOVE a fully upholster type, it's just not realistic with our crew. So, of course, I thought about having Jason built something. Great in theory, although I don't know if it would ever pan out. Plus, we have an air vent on the floor right where it would go, so I wouldn't want to cover that up....

Que, this little gem.
You might want to squint/tilt your head, because it's a bit on the ugly side ( at least it matches the table right now. Ha!). But it's got nothing but potention written all over it.


It was sold as a coffee table. But at FIVE feet long, it's the perfect base for my soon-to-be custum banquette. By placing a deep cushion on top, it will make it the perfect height (it's a little low right now)


I adore the details of the legs and bar. A little paint and this baby is going to be amazing. Now I just need to learn how to sew cushions :)

The best part? Only $14! Um, sold.

I promise, one of these days (if it ever warms up again) I will actually show you an "after" picture.


Hope everyone is having a great day!

xo,

Rachel


Wednesday, April 25, 2012

Mail Call

Things have been pretty hectic over here (as always!), and Party: Monster Trucks is under way.
We decided on having the party at a (:::sigh:::) bounce house, but I honestly think we found a great medium in the one we choose. First, we have the option to turn it into a glow party (complete with glow sticks for the kiddos and some blacklight bouncing action!), and we can actually bring our own decorations and snacks (a must for this mama). Although I wont be able to go as crazy detailed with the decorations as I usually like to, I can rest easy knowing that our little guy can still get one amazing, personalized party :)

To kick start some of our decorating fun, here is pic of the flag we just got in the mail today:


We ordered two, and I plan on pairing them with some b/w checkered flags, and maybe some of the other truck's flags (each monster truck has their own flag that is attached to the back of the truck, for all those who are not familiar with them. Read: me, two weeks ago LOL). A DIY project, I am sure :)

Although I am not sure who is more excited to have it: Jason or the birthday boy. Ha!

Tomorrow I will be here with some pictures of an AMAZING thrift find I got today, so I hope to see you then!

xo,
Rachel


Monday, April 23, 2012

Sneak Peak of Things to Come

I don't know about you, but I have been one busy girl around here :)

I have been getting everything ready to add my Care Bear party package to my Etsy storefront, which includes more staging and photo editing. On top of that, I have made it my goal to place the Mod Monkey party I threw last November on there as well. That party was a ton of fun to do and I can't wait to show it off to you (hopefully this week!)

In the meantime, here is a sneak peak of some of the things I have been working on (including the Care Bear invitation, I just realized I never showed on here!):


I must say, I don't think I recieved any complaints about all the "props" I had to buy to stage some of my items :)

 
Wishing You a sweet week as well!

xo,
Rachel

Sunday, April 22, 2012

Weekend Wrap Up

Hello!
How's your weekend going?
Just a little old-fashioned bug hunting over here :)


Hope your weekend was full of adventure as well!


Friday, April 20, 2012

DIY: Lazy Susan Art Center

Hello all!

As promised, here is a quick tutorial (and freebie!) on how I created the Lazy Susan shown here. And thanks to all who voted and shared the link!

So, let's get to it!


First, I found this plain, old lazy susan on one of our {many} thrift shopping expeditions. I pretty much knew instantly what I wanted to do with.


1. I did a light sand and then primed and painted it white. The center in this photo was a test to see if I wanted to paint it yellow...I eventually chose purple.
2.I painted the outer edge a bright red, knowing that I would want it to look "Seuss-y". I just used some acrylic paint I had lying around, because I knew I would be covering it with a protective finish. If I weren't doing the final step, I would have used a latex.
3. After I painted the center purple, I was left with a smudgy line, so I covered up all messes with more white paint
4. I applied the polka dots with a round sponge paintbrush
5. I let some of the circles go over the edge, and even made some oblong, so they weren't too perfect.


6. I outlined all my circles (making sure not to be perfect!) and painted wavy lines in blue
7. I outlined the lines in the same sharpie marker I did the dots. Outlining is essential! It is really what makes all the details pop and look more cartoonish.

The red pails were dollar finds from Target. (In fact, I stumbled across them when they were on clearance for only 40cents!!)

I created the labels myself and attached them with glue (although they could have been printed with sticker paper also) and then did a protective coating of ModPodge over them to protect them from all the drawing I knew they would endure from my kids :)


It's definitly something we use EVERY day.

And for Freebie Friday, you can print up some labels to make your OWN art holders!


Just click HERE to get your own!

Happy creating!

xo,
Rachel


Thursday, April 19, 2012

Reduce, Reuse, Recycle: EarthDay Inspired Party Decorations

Hello! I hope everyone is doing well :) We have a house full of sickies here (little, whiney ones to be exact. Ha!)

Tomorrow we go to check out some venues to have Jameson's party at. I am always torn on whether to have parties at our home or to have them at a "destination." And by destination, let's be honest, I mean an indoor bounce house place. Is it just me, or is everyone's kid having thier parties at one?? I usually try to shy away from these places because they're expensive, impersonal, and well....just not as much fun as the parties I throw here :) As he gets older though, his parties are getting larger (his class is 25 students, and that's not including his other friends. And, as he has already informed me, we are inviting everyone in his class). My concern is having all these children at our home and not being able to entertain them enough. So, we are looking at different places. My main concern is being able to provide our own decorations (duh) and really making it personal. Wish us luck:)

In the mean time, in honor of Earth Day, here are some amazing projects that use objects probably already around your house. I love projects like these because they really keep the price in check when party planning!
Click on any link below to see full tutorials.


1. Cover up some aluminum cans in scrapbook paper or fabric to gather party supplies
2. Create rockets out of toilet paper and use as decoration or favor boxes
3.  Use tissue boxes to create monsters for a monster bash or for Halloween
4. Spray paint pickle jars to create an AMAZING favor box for a lego party (link unknown)
5. Any monster bash or dinosaur party would be perfect for these tissue box feet
6. Buy glasses and plates from a thrift store, paint, glue together, and voila! Cake stands!
7. Take your old soda bottles, fill with colored water (and maybe a glow stick!) and bowl
8. Create custum candy pouches from brown paper bags
9. Spray paint old cookie tins (Goodwill always has some!) to match your party theme
10. Use Sunday's newspaper for something other than coupons- create this wreath


Hope you are inspired to take something old and turn it into something amazing!
me? I am inspired to throw a lego party now! ha!


xo
Rachel


Tuesday, April 17, 2012

Tire Inspiration

Hello!

As promised yesterday, I have found some amazing inspiration for the awesome tires we found this weekend at the fleamarket (shown yesterday).

Like this beanbag toss game:


Or use it to make cool graphic art (I am thinking maybe on a table cloth or back drop?)
source


LOVE the idea to use it to boost a plate or platter


I think I might have do something like this:


I would love to use the rims for an amazing backdrop like this:

This would be a good way to reuse it after the party...OR you could even put a can in it and fill it up with ice and put your drinks in it!

You can see a lot of the ideas I am slowly gathering for his party on my PINTEREST BOARD. What do you think so far? Which idea do you like best?

Also, while you're busy doing that, you should stop by Goodwill's Facebook to vote on my "upcycle" project. All you have to do is first like the FB page and then like either of the two projects I submitted (shown below). Both were projects I created using (duh) things I found at Goodwill. :)

{lazy susan turned art supply organizer}

{broken frame turned pinboard}

Thanks in advance for any support! You have until April 23rd to "like".

Tutorials on both projects to be posted this week in honor of EarthDay!!

Hope you all are having a "wheely" great day :) lol


Monday, April 16, 2012

Weekend finds

Happy Monday!

I hope your weekend went great; ours was pretty laid back with a little bit of thrift shopping...of course:)


Since monster trucks are the topic of conversation around our house these days, it makes sense that a lot of the finds we found were geared towards that:


Like this amazing little set of tires! I knew I wanted to try to score some free tires off of Craigslist to do something crafty with them as decoration, so when I first passed these my initial thought was "too small; I will find bigger ones online." (they may look big in the pictures, but the are only 17' wide!)  But second time around, it hit me: duh. Small would be PERFECT for centerpieces....or DIY platters...or insert a gazillion ideas. Hopefully by tomorrow I will have gathered some great ideas for you. And what perfect timing, right? EarthDay is in just a few days, and what better way to celebrate than with a little upcycle project?

We also scored these little gems:


Vintage soda ads!!!  As in perfect-for-our-vintage-barbque ads! Plus, they are just so fantastic to look at, I think I might just frame them and use them as art :)


The last item we found I haven't actually bought yet, but I couldn't resist snapping a picture of at the store :


Wouldn't this be amazing for our party?? I didn't buy it because I wasn't sure what to use it for, but I think I am going to go back and pick some up...I am pretty sure I can come up with a few good ideas lol. Tell me, what would you do with it?? It's about 2" wide, so I might end up cutting it in half....hmmm.

Hope you weekend was great!!

xo,
Rachel


Friday, April 13, 2012

Freebie Friday: April Showers Print


I don't know about you, but I am SO happy that it is Friday :)

Today, I conclude my week of April Showers fun, with a little printable that I hope inspires you to decorate and celebrate spring! (and maybe even throw a little soiree :) )


I was so inspired by the LOVE print I showed off yesterday, that I wanted to take those colors and incorporate them somewhere in our home for spring. Here's the print:


And here's my print:


Get the FREE printable HERE!

Have a great weekend!

xo-
Rachel


Thursday, April 12, 2012

Baby Shower : April Showers

Imagine throwing an April's Showers Bring May's Flowers themed baby shower...
Couldn't it be just amazing?
A sophisticated pallet and charming details really turn an ordinary brunch style shower into something amazing!

1 / 2 / 3 / 4 / 5 / 6 / 7 / 8 / 9 / 10 / 11 / 12


Just a little side note, number three is strictly a mock-tini :) A grape juice mimosa, of course!


xo-
Rachel

Wednesday, April 11, 2012

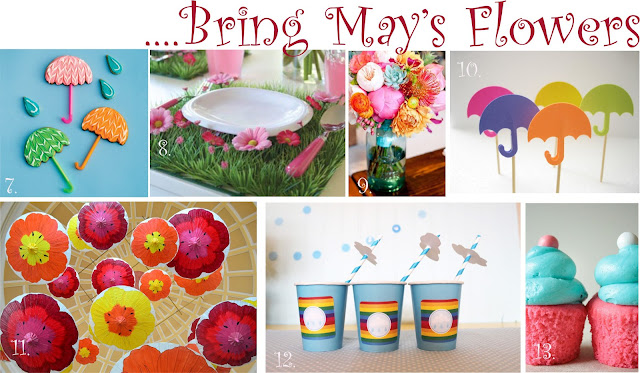
April Showers Party

Happy Wednesday!!

Today I am continuing my April Showers inspiration with some adorable ideas for a fun children's party, or even a baby shower!

Like these adorable invitations:


 1/2


I would play up the raindrops and umbrellas for this fun party. Hang umbrellas upside down (like the colorful flower ones pictured below) for decorations and make sure to have lots of those "May" flowers around!

 
1 / 2 / 3 / 4 / 5 / 6 / 7 / 8 / 9 / 10 / 11 / 12 / 13

I hope you are having an inspiring day!

xo-
Rachel

Tuesday, April 10, 2012

April Showers

As we are getting ready to "batten down the hatches" here, I gathered a little inspiration to prepare us for all these 'April showers'.

1 / 2 / 3 / 4 / 5 / 6


ENJOY!

xo-
Rachel

Monday, April 9, 2012

Easter

Hello! I hope you all had a wonderful Easter!
 We had a ton of fun, starting with this:

A bunny paw print! That silly bunny forgets to wipe his feet EVERY year :)

After that, came baskets, a neighborhood egg hunt, and of course DINNER:

Last week I saw this beautiful setting on this blog:


I LOVE the whole mossy nest and the personalized egg. So, I took this idea and tried to make it a little more kid friendly by using edible grass and plain plastic eggs (with a few goodies inside, of course!). Each child had their own nest, with an egg labeled with the letter of their name. I knew I hit a home run when even my daughter told me she loved the nests :)


Some peep straws, a chocolate bunny napkin ring, and the beautiful tulips Jason got us, and we were set!


I even got started on a few projects!! Sneak peak:


It really was a great day :)